Showing posts with label kids. Show all posts

Thursday, September 26, 2013

Thankful Thursday - plus pic of silhouette cameo created art by kids

Being positive and grateful is a good mental exercise and I'm feeling sluggish in that department. So since today is the 26th and I missed a week or two, I'm doing makeup exercises today.

Things I am thankful for:

 #1 I'm thankful for my Heavenly Father and my Savior, Jesus Christ.
 #2 I'm thankful for my husband. (I helped the kids make the artwork below for Father's Day.)
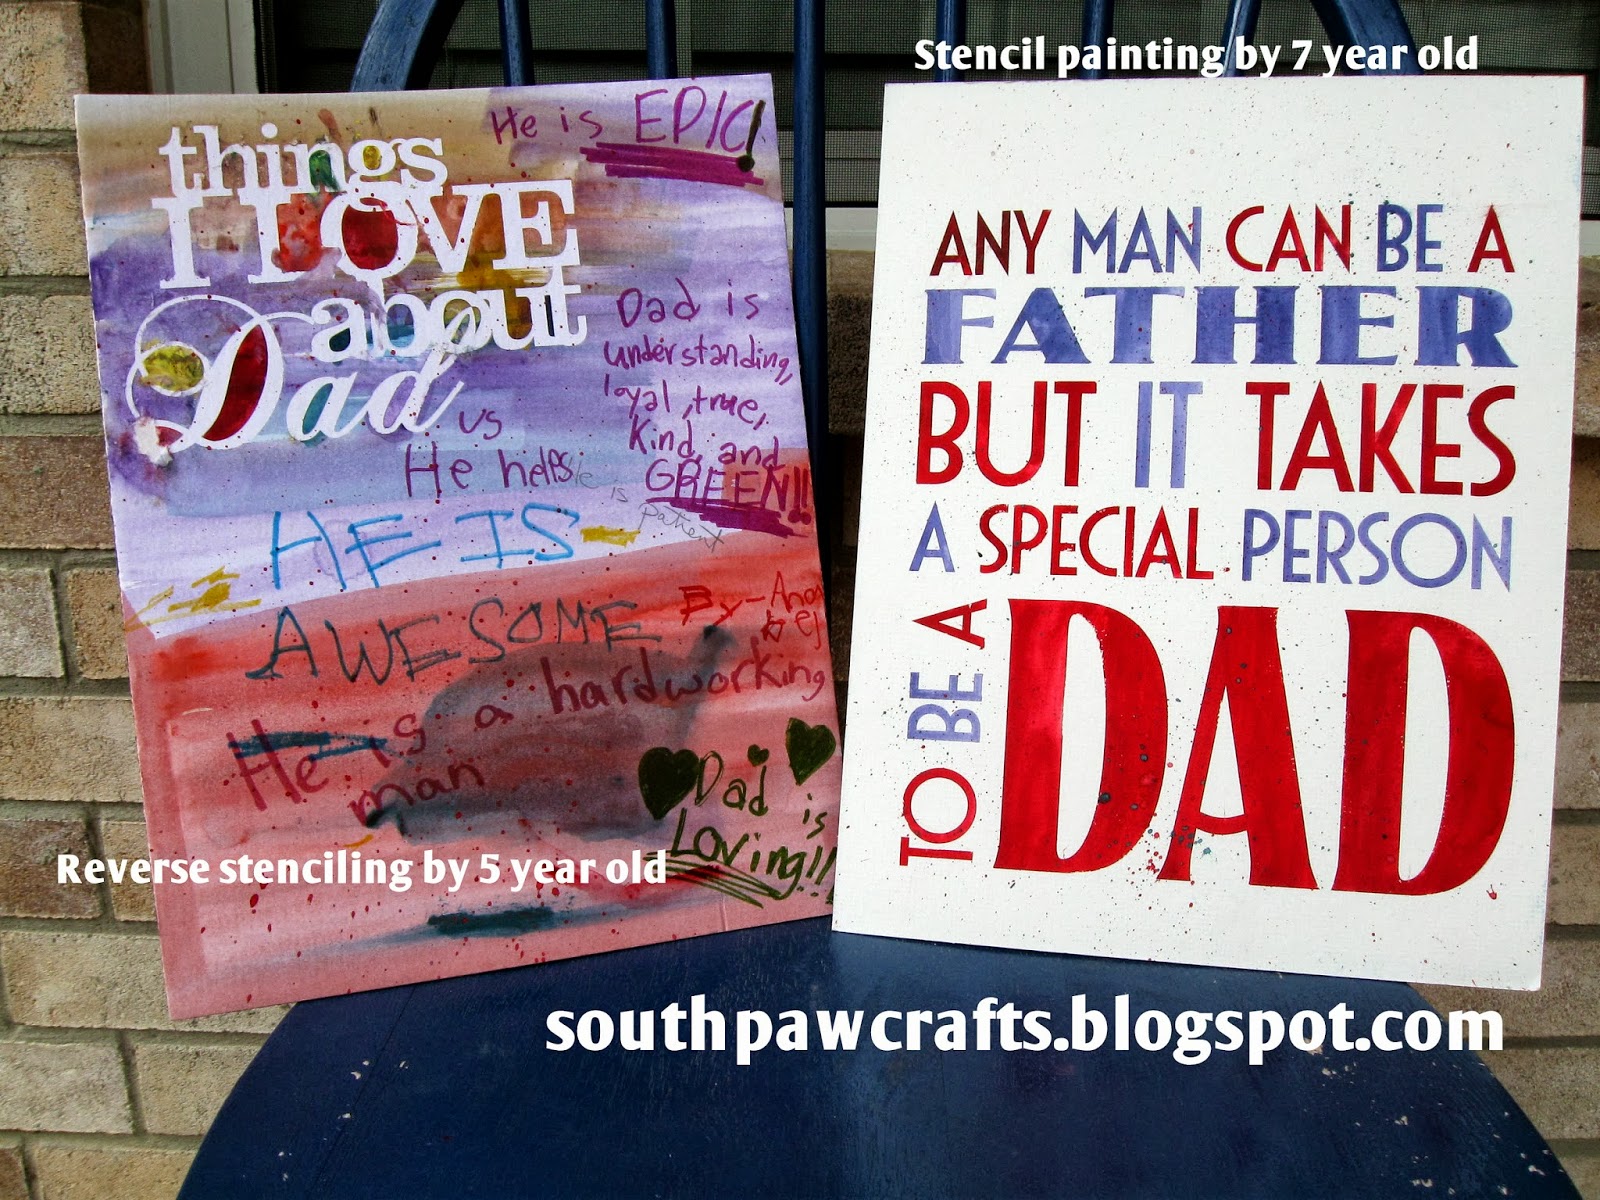
Kid Created Art (with help of the silhouette cameo)


#3 I'm thankful for playgroup which gives me two hours of me time a week.
#4 I'm thankful for friends, even if they do move away.
#5 I'm thankful for music.
#6 I'm thankful that my kids are learning to play instruments.
#7 I'm thankful my parents insisted that I learn an instrument (flute).
#8 I'm thankful for blogging. It's a great creative outlet and I love seeing other people's creations too.
#9 I'm thankful for rain (we finally had some last week).
#10 I'm thankful for my bike and bike trailer. This morning another Mom and I went biking with our kid trailers in tow. We were passed by a group of "pro" bikers. I'm sure we made them smile - us and our mountain bikes and our kids!

Time's up (this was a timed exercise simply because I need to go pick up a kiddo from playgroup now).
Use your mental muscles and see how many things you can be thankful for in 5 minutes!

Monday, August 26, 2013

Cheap Family Fun - marshmallow wars!

This week I changed the song "it's a marshmallow world in the winter..." to "it's a marshmallow war in the kitchen." For some reason b-o-r-e-d spells f-i-g-h-t for some of my children. To disrupt this cycle I needed something creative and constructive for them to do. I'm not sure that marshmallow wars are constructive, but they met the creativity requirement and the supplies were already on hand. So the battle commenced.

Battle Equipment Needed
  • balloons (we used 9" round balloons from the dollar store)
  • cups (we used old sippy cups that were about to be retired and an ancient plastic cup - I found that my disposable plastic cups were too flimsy for the job)
  • ammo - marshmallows (pom poms would work too - if it's edible the ammo is more likely to be retrieved and not scatters throughout your house for weeks on end)


Tactical Planning

  • I found that a box cutter was the best weapon for cutting the cups. (Of course the children should be granted amnesty from this task. And your weapon of cup destruction should be heavily guarded to prevent friendly fire injuries.)
  • Cut the tip off of your balloon before putting a knot in the end of it. (That way it's easier to make a straight line with your almost-never-used-for-quilting rotary cutting equipment - scissors work fine too)
  • Don't cut too much off of your balloon. It needs to still have some curve to the help the balloon stay on the cup.
  • Ammo works best when placed in the "belly button" of the weapon and shot in an arched fashion. It may fall out if you try to shoot straight or down.
  • Beware - you are now a target! 
  • Feed the children before war so they get some nutrition in for the day! (The 2 year old probably ate way too many marshmallows, but was thrilled to be the ammo retriever and deactivator.)
  • Informal testing concludes that marshmallows are relatively painless. 


Ammo works best when placed in "belly button" of shooter.

not so LEGAL TEAM fine print: Play at your own risk. Marshmallow shooters are weapons of mass hilariousness and should be treated as such. Extended play includes risk of stomachache.

Thursday, August 22, 2013

Creativity in Kids

A friend introduced me to TED Talks and the first one I listened to (and I've only listened to 3 more since) was a talk given by Ken Robinson titled "How Schools Kill Creativity".  My take away quote was this: "If you are not prepared to be wrong, you will never do come up with anything original."

This summer we have been cultivating creativity at our house. Most of the time this is fabulous and wonderful, but I have to admit not being too excited about my children learning how to climb door frames.

I am thankful for creativity and that my children can harness their imaginations to entertain themselves and their siblings.


Tuesday, July 9, 2013

Dollar Store Orbeez - Super Money Saver!

If you have an orbeez lover, you need to check out the "Hydrating Beads" with folding plastic vase at the dollar store (Dollar Tree). My research team and I had great fun comparing the two.
First of all a refill package of Orbeez is $10-15. The Dollar Tree version is $1 (of course). When dry the dollar version is slightly larger than the regular Orbeez and when hydrated they are quite a bit bigger and not as dense (i.e. more subject to falling apart). But both versions bounce all over the kitchen floor quite nicely.

Orbeez are fun for sensory play, but they can also be used to make neck coolers (great for hot weather outdoor events). If you want to try that I recommend the tutorial by Little Birdie Secrets. And if you can't find this item at your local Dollar Store, try the floral department at your craft store, or google "Orbeez" or hydrating beads and you will find ebay sellers and more.

Tuesday, April 9, 2013

Car Carrier Book - Quasi Tutorial

Welcome to my garage tutorial - garage for your matchbox and hot wheels that is.


Supplies Needed:

1/2 yard fabric (this one says exclusive of JoAnn's so try there if you want the awesome road fabric)
1 - plastic canvas 12" x 18"
1 - scrap of batting or piece of fleece 13" x 18"
1" wide elastic (I used fold over elastic but regular would work too)
velcro

1. Cut:
2 - 13" by 1/2 yard wide (18"). I didn't prewash but you can if you like.
2 - 3 1/4" by 18" pieces for handles
1 - 13" x 18" piece of batting.

2. Take one piece of fabric and measure 2" and 6" from 13" side (not 2 1/2" and 6 1/2" as shown in the picture). This is where you pin the elastic. Fabric is folded in half to 13" x 9 in picture.

3. Use 1 7/8" loops (I did 2" and the cars tend to slide out). It is 1 1/2" from one lane to the next lane so pin the 1 7/8" loops 1 1/2" apart. Got it? Good. Go ahead and sew the elastic down.


4. Fold handle pieces in half length wise right sides together. Sew and turn right side out. Iron. Decide that 18" in too long and chop 5" off (or read the quasi tutorial all the way through before starting and just cut 3 1/4" by 13" pieces for handles instead).


5. Cut the plastic canvas into three pieces: 2 - 7 7/8" by 11 1/2", and one 1" x 11 1/2" piece for the spine.

6. Stack your hot wheels book sandwich. Batting down first, then fabric (right side up). Next pin the handles to the ends with the handles going in (as pictured). Then other side of fabric (right side down - so right sides are facing). Pin.

7. Sew. Leave approximately 8" opening on long side for inserting plastic canvas later.
8. Clip corners and turn right side out. Next iron on a title page if you just happen to feel like it.


9. Adjust plastic canvas to fit (if necessary). Insert one side and sew next to spine. Insert plastic canvas spine and sew.


10. Sew opening shut. Sew velcro on handles (and wish you did that before sewing the sandwich together).

Presto - BOOK Oh!


Sharing space in the garage here:

http://clippiedips.blogspot.com/2013/04/time-for-you-tuesday-9.html

Tuesday, March 26, 2013

When We're Helping Momma's Happy

One of my favorite children's songs says, "when we're helping, we're happy." Well, when the children are helping the Momma is happy too. For months I've been writing job assignments and rotating them. When the paper is finally illegible because I just keep scratching out names rewriting them I write it again. That finally will stop because I made this!

It hangs on the wall (not on my winter blanket) and I did put the names of my princes and princesses on the board. No I do not have a child named Saturday - that's where Saturday jobs hang out till Saturday.

I did a pinterest search looking for chore chart ideas. So for my inspiration look at Ginger Snap Crafts' chore chart . I used the same quote (love the same children's song). And my 5 year old picked the color, which I just noticed happens to be very similar to the chore chart at Ginger Snap Crafts!

My philosophy is that the kids have one job each day that contributes to the household. Make bed, put away pjs, brush teeth, etc those are personal responsibilities and I will remind as necessary, but I don't check them off everyday or consider them a chore/job.

The current daily jobs are set table, empty dishwasher, take the garbage and recycling out, pick up the living room (before Dad gets home), and help empty the silverware (she's not even 2 yet so that is a flexible one). Did I mention I have 5 kids?

Here's another look, minus the crowns. ;) AND did I mention the circles on the stars are dry erase vinyl? So when I need to change chore assignments it's a cinch!


Monday, February 11, 2013

Music Monday - The Beginning

J Practicing Piano Upside Down = FUN!!

Welcome to the first ever Music Monday!

I'm a crafter + musician = crafty musician! I love good clean humor and I think practicing music can be fun. My children don't always agree with me on that last statement, but we are working on it.

On Music Mondays I want to share what is working (or not working) for me as I help my own children learn the joys of music.
 
Mom - maker of music and crafts and piano teacher to Miss J and Mr. Z.

Miss K. - 5th grader in school strings program learning violin

Miss J. - 3rd grader learning piano

Mr. Z. - 1st grader beginning piano (first lesson earlier this month)

So practicing upside down isn't recommended all the time, but it is fun to try once in a while.

Leave a comment and tell me what makes practicing fun for your mini musician.


Related Posts Plugin for WordPress, Blogger...