Thursday, August 29, 2013

Cutting Poly Satin with Silhouette Cameo - Paying it Forward

It's Thankful Thursday. As I have started an online craft business I have gleaned helpful information from many people. Some I knew before starting my business. Others I "met" through online interactions with their businesses. Almost without exception everyone has been very kind in sharing their expertise. And I am thankful for their help.

So when a friend posted on FB that she was considering a cricut or a silhouette cameo and wanted to know if the cameo could cut poly satin material that she uses in creating super hero capes, I was happy to try it out for her before she decides what to buy. (And I love experimenting with new techniques and materials.)

A picture is worth a thousand words so I'll let the pictures do most of the explaining.

Cutting circles without interfacing - the fabric moves too much even with a sticky mat.

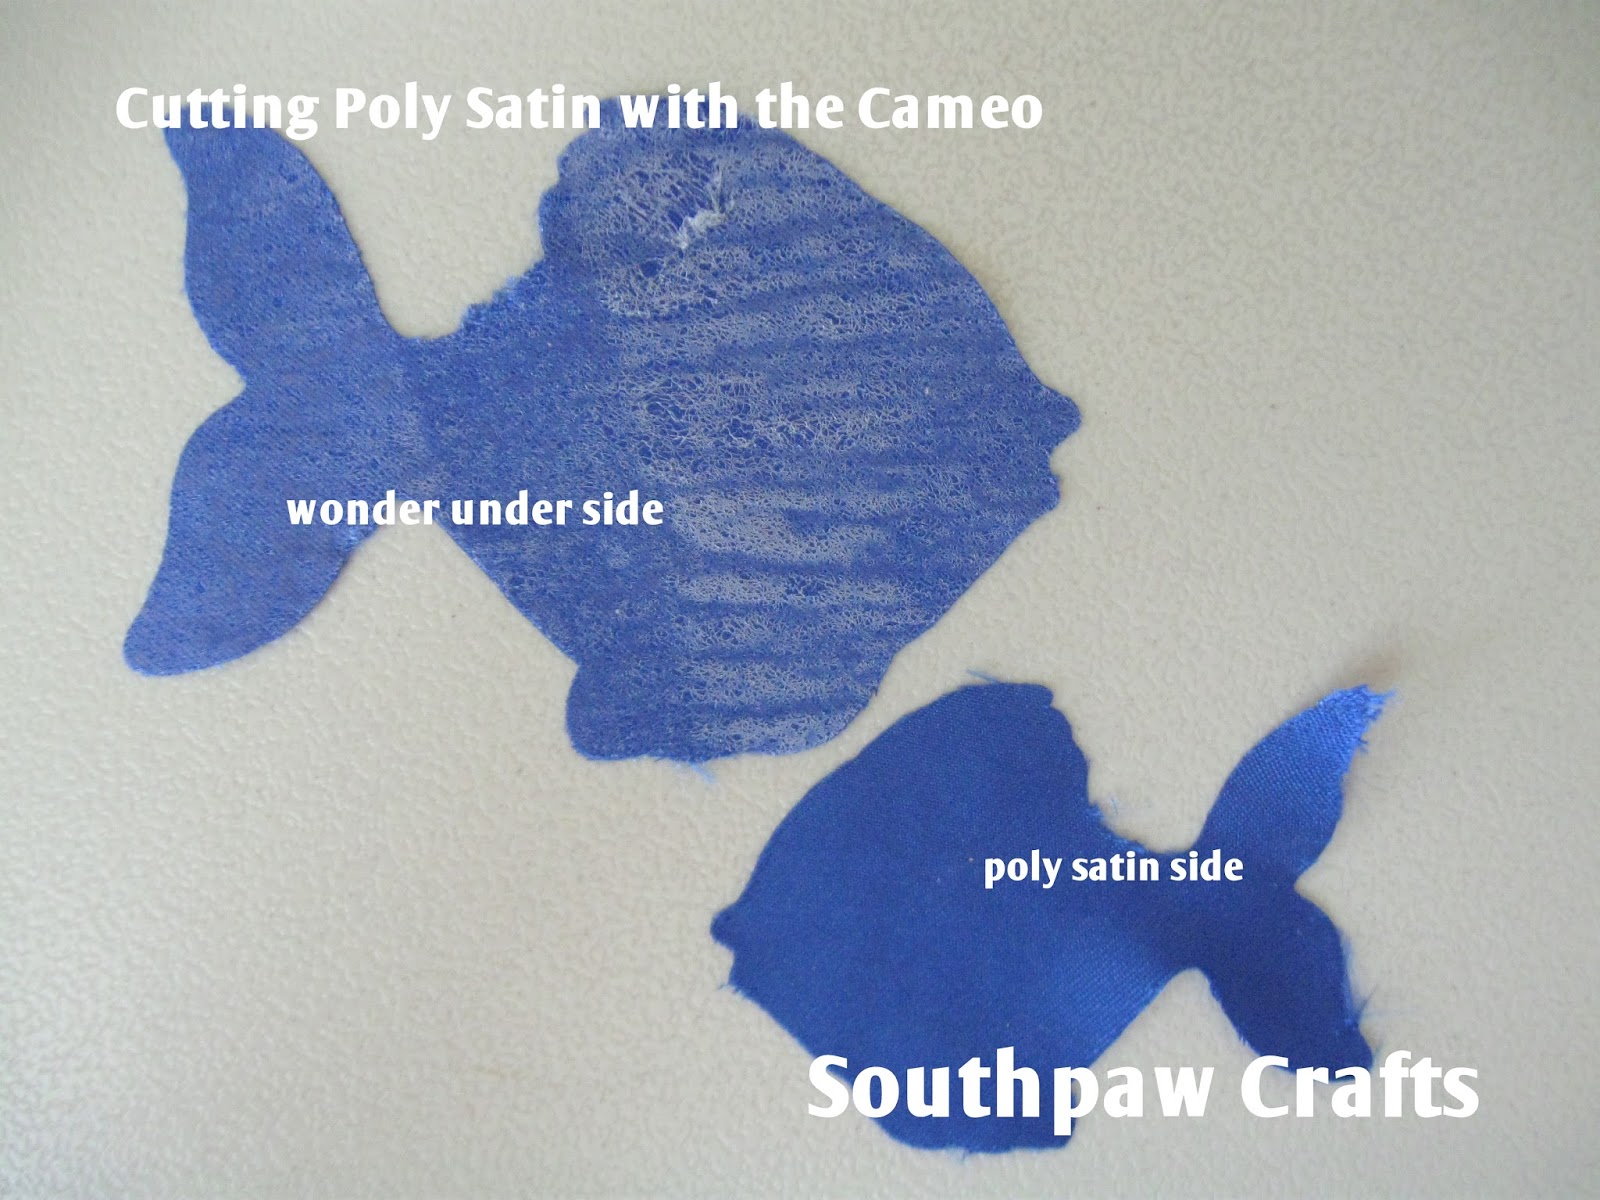
Cutting fish with wonder under interfacing with paper backing stuck to mat. Much better. This fish is approx. 4"x2.5".


Small fish was 2.5"x2". Better results with larger images to cut. Most of this fraying would be covered by topstitching your applique. The larger fish didn't fray much at all.

Cameo screen shot. Settings: speed-2, thickness-33(maxed), blade-10(maxed). Double cut.

It works!
Suggestions for perfecting the cut: fresh blade, better application of wonder under (only my second time using wonder under so I may not have done the best job of ironing it on), cut larger designs. You could also try starching the fabric to make it stiffer.

In the pictures you can see that I used a cricut mat in my silhouette cameo. Works great. Costs less!

Happy cutting!

Monday, August 26, 2013

Cheap Family Fun - marshmallow wars!

This week I changed the song "it's a marshmallow world in the winter..." to "it's a marshmallow war in the kitchen." For some reason b-o-r-e-d spells f-i-g-h-t for some of my children. To disrupt this cycle I needed something creative and constructive for them to do. I'm not sure that marshmallow wars are constructive, but they met the creativity requirement and the supplies were already on hand. So the battle commenced.

Battle Equipment Needed
  • balloons (we used 9" round balloons from the dollar store)
  • cups (we used old sippy cups that were about to be retired and an ancient plastic cup - I found that my disposable plastic cups were too flimsy for the job)
  • ammo - marshmallows (pom poms would work too - if it's edible the ammo is more likely to be retrieved and not scatters throughout your house for weeks on end)


Tactical Planning

  • I found that a box cutter was the best weapon for cutting the cups. (Of course the children should be granted amnesty from this task. And your weapon of cup destruction should be heavily guarded to prevent friendly fire injuries.)
  • Cut the tip off of your balloon before putting a knot in the end of it. (That way it's easier to make a straight line with your almost-never-used-for-quilting rotary cutting equipment - scissors work fine too)
  • Don't cut too much off of your balloon. It needs to still have some curve to the help the balloon stay on the cup.
  • Ammo works best when placed in the "belly button" of the weapon and shot in an arched fashion. It may fall out if you try to shoot straight or down.
  • Beware - you are now a target! 
  • Feed the children before war so they get some nutrition in for the day! (The 2 year old probably ate way too many marshmallows, but was thrilled to be the ammo retriever and deactivator.)
  • Informal testing concludes that marshmallows are relatively painless. 


Ammo works best when placed in "belly button" of shooter.

not so LEGAL TEAM fine print: Play at your own risk. Marshmallow shooters are weapons of mass hilariousness and should be treated as such. Extended play includes risk of stomachache.

Thursday, August 22, 2013

Creativity in Kids

A friend introduced me to TED Talks and the first one I listened to (and I've only listened to 3 more since) was a talk given by Ken Robinson titled "How Schools Kill Creativity".  My take away quote was this: "If you are not prepared to be wrong, you will never do come up with anything original."

This summer we have been cultivating creativity at our house. Most of the time this is fabulous and wonderful, but I have to admit not being too excited about my children learning how to climb door frames.

I am thankful for creativity and that my children can harness their imaginations to entertain themselves and their siblings.


Monday, August 19, 2013

Felt 3D box - a craft success


After my miserable craft fail I had to try my next outside the box idea. Fortunately this one worked like a charm (box).

  • One note about printing from silhouette, go to the "line style" option and select "print lines of selected shapes" at the bottom of that menu. You can also make the lines larger. For this example I think I used a 2 pt line.

 1. Print your pattern on freezer paper.
2. Iron freezer paper onto felt. Shiny side down, no steam.
3. Cut out.
4. Bend on dotted lines. I used a ruler to make sure I got a straight fold.

5. Use a razor blade/utility knife/exacto knife (whatever nickname you give yours) to cut the small openings.

6. Assemble. Then contemplate what kind of ring Robin Hood would give Maid Marian in this little box. Or if your box is a different color feel free to contemplate any other question that comes to mind.

Friday, August 16, 2013

Print on Fabric Craft FAIL!

Today I up got inspired to try my hand at printing on fabric. 

  • I took out my roll of freezer paper (fresh from the baggie aisle in Walmart or probably stale by now since I've had it for years). 
  • I cut several pieces to 8 1/2 x 11 so they would fit through the printer. 
  • Then I ironed it onto white cotton fabric (actually a sheet from Target that I have been using for various projects).
  • I selected two images from my silhouette collection. I changed one color so I would have yellow to test also.
  • Then I printed the file on printer paper and on two pieces of fabric.
  • The fabric went through the printer just fine with the freezer paper backing.


  • As you can see, method 1 did not work. Simply soaking it in vinegar did not set the ink. In fact it seemed to erase the ink. Maybe if I had let the ink sit for a few hours before the vinegar rinse it would have been different? I don't know.


  • Method 2 - heat set - I used my heat press and pressed it on medium pressure for 20 seconds at 350 degrees. It looked good so I decided to wash my towels (and my craft experiment). Craft FAIL!
What kind of craft failures have you had? And have you had success in printing on fabric and getting it to stay!?!

Thursday, August 15, 2013

Can you be a positive influence in the world?

Do you ever wonder if what you do makes a difference? Do you wish you could be a positive influence in the world? You can!

A few weeks ago I noticed a suggestive/inappropriate picture on the front page of etsy. I already have my etsy account set to filter mature content. I was disturbed that this picture was there. And it kept showing up for several days. Then I started to see pictures of underwear listed on the front page.

I am a Mom first and foremost and everything I do is visible to my children (except that secret Christmas shopping of course). I want the images I see online to be appropriate for all ages. After I was certain this wasn't just a one time event, I contacted etsy to say that as an etsy seller this was not acceptable and I would consider taking my store elsewhere if necessary. I never received a reply, but I'm happy to say the listings have been more appropriate since then.

Be the good you want to see in the world!

Monday, August 5, 2013

Marvelous Monday - Fridge Menu System and Dishwasher Magnet

dishwasher clean/dirty magnet
Organization is a constant battle. The kitchen is a frequent battle front. In an effort to have more quality conversations with my husband than, "is the dishwasher clean?" I created a dishwasher clean/dirty magnet. And then I just had to create about 5 more because they were so fun to make.

Mr. South likes the magnets. His overall comment was, "you know I suggested something like this about two years ago." My reply, "yes, but I didn't have a vinyl cutter back then."

Grocery shopping and meal planning is another battlefield. After weeks (literally - I'm not kidding) of trying to figure out the perfect menu board I came upon the perfect solution for me. Might not work for you, but I love it. It's a dry erase vinyl menu board on the fridge. So it can be used with menu cards held on by magnets (if I ever get that organized) or dry erase. 
Related Posts Plugin for WordPress, Blogger...