Monday, July 29, 2013
Out of Pocket
Hello friends - the shop is on vacation mode for a few days. And since I misplaced my superwoman cape I'm going to put the blog on vacation mode for a few days too. But as we all know there is no such thing as vacation for a mom. It's just a different type of adventure involving children and lots of patience (and hopefully some fun too).
Friday, July 26, 2013
Minecraft Throw Pillows with HTV
Today I'm over at My Vinyl Direct sharing a tutorial for Minecraft Throw Pillows. Go check it out!


If you'd like to try making your own, I have provided the minecraft silhouette studio file I created on my google drive. It's not quite perfect, but it worked for me. :)
Thursday, July 25, 2013
Thankful Thursday - Safety
This week I had a near car accident. I was driving on a two lane road at 50 mph and noticed a car coming towards me (also at about 50 mph). The driver was apparently distracted because the 1/3 of the oncoming car was in my lane. I swerved and they noticed they were drifting badly and corrected. No one was hurt (and I stayed on the road), but my heart was racing for a few minutes.
So let's all remember when driving that driving safely is number one priority. Don't let electronics (cell phone, mp3 player, whatever) put our safety at risk. Now if only screaming children were as easy to turn off as electronics........
So let's all remember when driving that driving safely is number one priority. Don't let electronics (cell phone, mp3 player, whatever) put our safety at risk. Now if only screaming children were as easy to turn off as electronics........
Monday, July 22, 2013
Marvelous Monday - Gallery Ledge Shelves Complete!!
Thanks to plenty of pinterest posts and inspiration I decided to bite off a big project. I followed the instructions from Shanty 2 Chic. (The original instructions are found at Ana-White.com.) I don't have a kreg jig so I just used screws to put it all together. I painted the shelves with the same paint I used on the wall. Then I myself (with my girls holding the shelf up while I drilled and screwed) put the shelves on the wall.


The good: I LOVE having room to display pictures, artwork, chore charts, recent craftiness, etc. I LOVE being able to easily change it out. I love not having to straighten pictures after every door slamming event (yes my perfect little angels occasionally slam doors). I love putting covering my thermostat. AND Mr. South even says he likes it!
The bad: this project took me SOOOOOOO long. I'm glad I bought the wood already cut to size. And I probably could have skipped using the round over bit on the top edges of the shelf (not in the tutorial, but if you own a router ya' gotta' use it, right?). But this seriously took my 5 different 1-2 hour sessions to complete. Probably not such a lengthy project for others, but with my particular crew (ages 11, 9, 7, 5, and 2) that was the best I could do.
The ugly: the screws attaching the shelves to the wall. I didn't bother to paint over them or anything because I figure they will be covered by all the pictures and artwork.
Saturday, July 20, 2013
Kaleidoscope Card - a Silhouette project
Inspired by a kaleidoscope I created this "card." Really it's a bunch of squares with 6 pointed patterns that can be interchanged to create different kaleidoscope like creations. I used my Silhouette Cameo to design the shapes and cut them (and my handy sharpie for the sentiment because I'm that crafty!).
 |
| Kaleido Card Arrangement 1 |
 |
| Kaleidocard Arrangement 2 |
 |
| Kaleidocard Components |
Friday, July 19, 2013
Cheap Sketch Markers for Silhouette Cameo

Thanks to a suggestion from a silhouette forum I discovered that dollar spot markers really do work in the silhouette! The challenge is figuring out how far down to place the marker in the little blue clamp.
 |
| Sketch in Progress |
 |
| Anchored in Perfection! |
 |
| Simple designs work best. This one didn't work very well at all. |
Thursday, July 18, 2013
Thankful Thursday - RAOK (Random Acts Of Kindness)
It's Thankful Thursday and I've made a new rule for myself to challenge myself a little more. Here's my rule: I have to report something I'm thankful for that has happened in the past week.
A few days ago I was driving toward a red light and noticed a man get out of the passenger side of a big Texas size truck. He walked up to the car in front of him, closed the gas tank lid, and walked back to his truck. I was touched. It was a random act of kindness by a total stranger. (And I felt a little guilty for immediately questioning my safety.) Let's all try to be a little kinder to those around us (even with our thoughts) and look for opportunities to perform small but meaningful acts of service this week.
A few days ago I was driving toward a red light and noticed a man get out of the passenger side of a big Texas size truck. He walked up to the car in front of him, closed the gas tank lid, and walked back to his truck. I was touched. It was a random act of kindness by a total stranger. (And I felt a little guilty for immediately questioning my safety.) Let's all try to be a little kinder to those around us (even with our thoughts) and look for opportunities to perform small but meaningful acts of service this week.
Monday, July 15, 2013
How to Make Your Own Free Vinyl Storage Containers
I finally found a way to store my rolls of vinyl and it's FREE! I made a quick stop at the local liquor store and asked if they had any boxes. After scoring 5 boxes and some puzzled looks from my children (who I promptly reassured that the only time I go to a liquor store is if I need sturdy boxes with dividers), I finished my errands and ran home to get started.
First remove the top flaps with your handy dandy razor blade cutter. Second, use some spare contact paper and cover the boxes. I just covered the sides and the top inside edge of the box. The advantage of the zebra stripe print is that it doesn't show the wrinkles very well.
Here's a quick visual for you:


You can't even see most of the vinyl in the before picture because it was being stored in my dresser. Now I can easily see what vinyl I have and know better when to reorder. And I can actually use the copy feature on the printer without moving tons of stuff. :)
The liquor store box solution might not work if you have lots of heavy rolls of vinyl, but it works perfectly for me.


Saturday, July 13, 2013
Using Circles and Pentagons To Make 12 Sided Dice or Ball
This week's Silhouette (as in silhouette cameo cutting machine) challenge is to make something using circles. Inspired by a school project my daughter brought home a few weeks ago, I cut out 12 circles with embedded perforated pentagons.


 |
| My pentaball cutting shape. |
Here's how to make the pentagon shape using Silhouette Designer Edition.
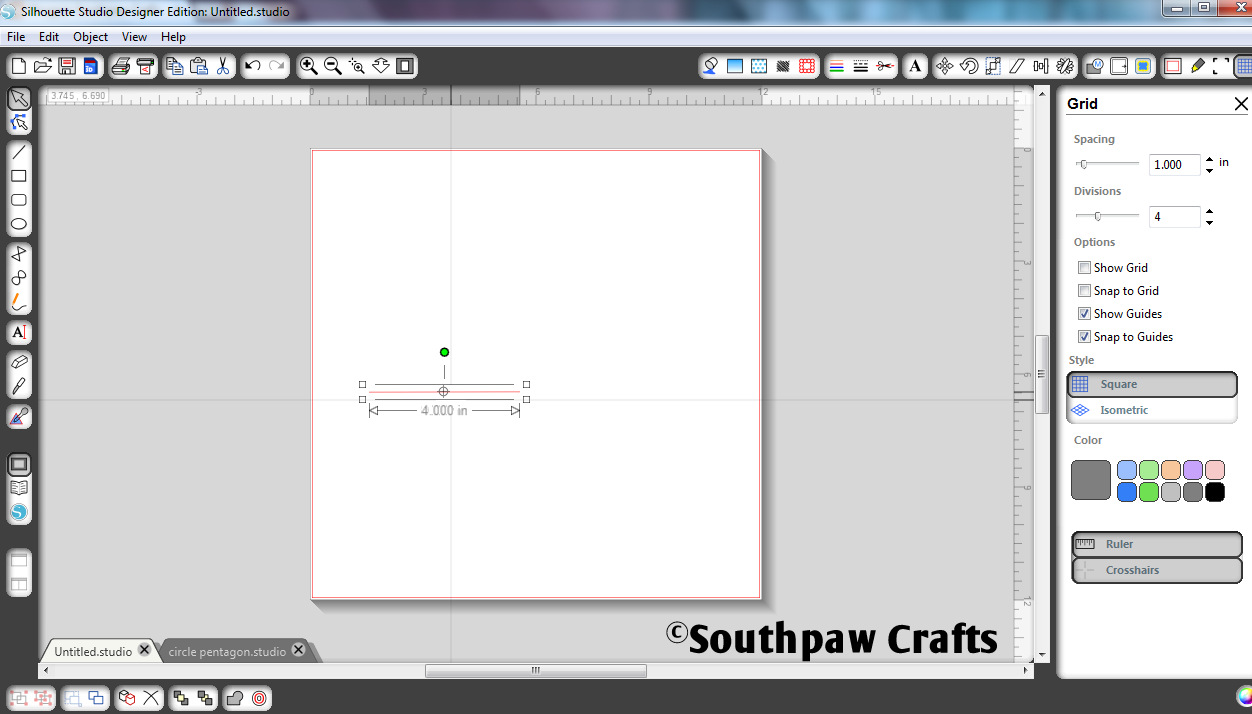
1. Draw a line. I made mine 4 inches.

2. Move the rotation point (looks like a little target) to the end of your line. It kind of snaps in place. This feature is only available in the designer edition (and it's my favorite feature too). The crosshairs and ruler you see in this picture are also designer edition features.

3. Go to the replicate window and select advanced options. You should see something similar to the above screen shot. Select "1 copy," "custom position," change the x and y positions to 0.000 inches, and set the rotate angle to 108 degrees. Then press "Replicate" and you should get the above image.
4.Repeat by moving the rotation target to the other end of your new line and replicate again.
5. Repeat until pentagon is complete. Then combine the lines into one shape.
6. Set the lines to perforate instead of cut. And size to fit your circle (the centering feature doesn't really help so zoom in and eyeball it if you have to).
After cutting out 12 copies of your nifty shape, fold the edges of the circle up on the perforated pentagon lines. Then assemble with a stapler or glue (but I'm not patient enough to glue it).
 |
| Fold on the pentagon lines. |
 |
| One half stapled together |
 |
| Two halves. |
 |
| Completed pentaball (I'm sure there is a real word for it, but I don't know it). |
I put the numbers 1-12 on my 12 sided die and tricked my kids into practicing their math. They each got 5 rolls and the person with the highest total won!
This post joined the party at Gingerly Made
This post joined the party at Gingerly Made
Friday, July 12, 2013
Minecraft inspired Blanket Twin Size DIY edition

Thursday, July 11, 2013
Thankful Thursday - Glasses Lost and Found
Monday we met some friends to play at the park in the morning. Then we HAD to stop by the craft store. (I saved $20. Does that make it okay to spend $20?) At the store I asked my daughter where her glasses were. She told me she took them off at the park and put them in my purse. Then she proceeded to dump the contents of my purse on the floor in a futile effort to find them. No glasses. No more errands. Visions of multiple $20 dollar bills flying out of the bank account and into the hands of the optical store......
Back to the park we went. No glasses. Asked the people at the park if they had seen the glasses. (I think they understood, but it would have been better if I knew Spanish.)
Back home to call all our friends who were at the park and see if they by chance noticed and picked up the glasses. Now partially blind daughter jets into the house to find the phone (loves the phone already and she's not a teenager yet), bypassing glasses sitting on the front porch chair. Grateful Mom tells partially blind daughter to come look on porch. Whew..... gratitude abounds (and the word "responsibility" has new meaning to said daughter - I hope).
Tuesday, July 9, 2013
Dollar Store Orbeez - Super Money Saver!
If you have an orbeez lover, you need to check out the "Hydrating Beads" with folding plastic vase at the dollar store (Dollar Tree). My research team and I had great fun comparing the two.
 First of all a refill package of Orbeez is $10-15. The Dollar Tree version is $1 (of course). When dry the dollar version is slightly larger than the regular Orbeez and when hydrated they are quite a bit bigger and not as dense (i.e. more subject to falling apart). But both versions bounce all over the kitchen floor quite nicely.


Orbeez are fun for sensory play, but they can also be used to make neck coolers (great for hot weather outdoor events). If you want to try that I recommend the tutorial by Little Birdie Secrets. And if you can't find this item at your local Dollar Store, try the floral department at your craft store, or google "Orbeez" or hydrating beads and you will find ebay sellers and more.
Subscribe to:
Posts (Atom)